-
GENERAL WARNINGS FOR TRANSPORT
a) Observe the maximum load and stacking limits.
b) Follow the indications shown on the packaging, any instructions on the equipment, including those on the points where fork lift trucks and pallet trucks cannot be used.
c) Danger of crushing during transportation due to the weight of the appliance
d) Hands and fingers may be crushed.
e) Wear suitable protective clothing when transporting.
f) Transport requires at least 3 people.
g) Danger of overturning during transport.
h) Danger of crushing due to the appliance overturning on persons.
i) Take care over the centre of gravity of the appliance.
j) Take great care to ensure that the appliance does not overturn during transportation and lifting.
- Take care over the width and height of accesses during transport.
Take care not to damage the appliance due to narrow doorways: for doorways less than 80 cm wide, remove the handle and door closing mechanism. - Make sure that the appliance cannot overturn during transport and after installation.
- Check that all of the parts of the appliance are intact and have not been damaged during transportation. If damage has occurred due to transportation, inform the specialised reseller/haulier immediately
- Room temperatures below freezing may cause damage to the appliance. Only assemble/install the appliance in places protected from freezing.
- To position the appliances, it is recommended to use the mount offered by the manufacturer; should you want to do things differently, it is necessary to take account of the weight of the appliance.
- Before permanently fixing the oven in position, the water, electrical and gas connections must be made (see relative sections).
-
REMOVAL OF BOTTOM SIDE PANEL
On the front side, the panel is connected by two teeth to the front structure, while the rear is connected to the foot by way of a magnet.

To remove the panel, release it from the rear foot (1) and pull it out from the front structure (2).

- To access the connections, remove the bottom right-hand side panel
A• Electrical power supply input
B• Cold water supply input
C• Gas supply input
D• Softened water supply input (up to a max. temperature of 50°C)
E • Condensate and wash water drain
For models:061-101-062-102-201-202 054-084-154

For models:161 - 134

- The distances from other appliances or from adjacent walls that must be left to allow access for servicing operations will be found on the installation diagram for the oven to connect. In the event of the oven being installed directly against an inflammable wall, suitable heat insulation must be provided.
- Current fire regulations should be meticulously observed and respected. Do not obstruct the openings and slots in the casing as they disperse the heat in the electric component compartment. Keep strictly to the installation diagrams.
- Once the appliance is installed, the electrical power cable must be protected, and never stretched or tugged.
- The appliance must be level: any difference in level or sloping of the supporting surface should be eliminated. Differences in level or sloping negatively affect oven operation.
- Danger of crushing during installation Fingers, hands and feet can be crushed by the appliance. Wear suitable protective clothing during installation.
- Remove all packing materials and peel away the protective plastic film from all external surfaces of the oven.
- For free-standing models, the appliance needs to be levelled: small differences in level of the supporting surface can be eliminated with the adjustable feet (by screwing or unscrewing them). A significantly uneven or sloping stance can affect the operation of the oven adversely. For models equipped with a pan trolley, it is necessary to pay special attention when levelling.
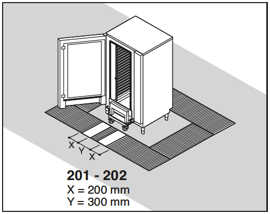
- Lining up the pan trolleys. If the floor is not level, aremedy must be found using an access rampwith a maximum gradient of 4° (not included inthe supply).
If there is an outlet grate in front of the appliance, it is necessary to fit runners in the pan trolley entry area.


-
OPENING THE CONTROL PANEL
If the control panel needs to be accessed, remove the plastic plug situated in the top part of the panel.

Depending on the model, insert a 4mm or 5mm hex key into the hole in the top part of the panel and unscrew the screw applying certain pressure, until it is released.

Once the panel is released, make it rotate to the right on the supporting hinges.
